| [root@tsai
/root]# cd /usr/share/sendmail-cf/cf
[root@tsai cf]# vi redhat.mc .......... dnl TRUST_AUTH_MECH(`DIGEST-MD5 CRAM-MD5 LOGIN PLAIN')dnl dnl define(`confAUTH_MECHANISMS', `DIGEST-MD5 CRAM-MD5 LOGIN PLAIN')dnl .......... DAEMON_OPTIONS(`Port=smtp,Addr=127.0.0.1, Name=MTA') .......... |
| ..........
TRUST_AUTH_MECH(`DIGEST-MD5 CRAM-MD5 LOGIN PLAIN')dnl define(`confAUTH_MECHANISMS', `DIGEST-MD5 CRAM-MD5 LOGIN PLAIN')dnl .......... DAEMON_OPTIONS(`Port=smtp,Addr=0.0.0.0, Name=MTA') .......... |
| [root@tsai
/root]# cd /usr/share/sendmail-cf/cf
[root@tsai cf]# sh Build redhat.cf [root@tsai cf]# mv /etc/sendmail.cf /etc/sendmail.cf.old <==備份舊的檔案 [root@tsai cf]# cp redhat.cf /etc/sendmail.cf <==加入新的參數檔 [root@tsai cf]# /etc/rc.d/init.d/sendmail restart <==重新啟動 sendmail |


既然 Red Hat 7.1 可以具有身份認證的功能,那麼其他版本的 Red Hat 是否可以呢?當然可以了!只是動作會變的比較麻煩就是了!因為 Cyrus-sasl 這個套件所支援的 Sendmail 版本需要大於 8.10.0 以上,而且 Red Hat 6.X 版並無預設的 Cyrus-sasl 套件,所以你必須要捉下這兩個套件來安裝才行!
- 下載所需套件:
sendmail:sendmail 可以到 sendmail 的網站上下載最新的套件,或者由『這裡』下載;
cyrus-sasl:這個認證函式庫可以到 Carnegie Mellon University 網站上看看,或者由『這裡』下載;
- 移除與備份之前版本的 sendmail 設定:
為了讓你未來還可以使用舊的 sendmail 來安裝你的原先的設定,所以請備份以下的檔案吧(使用 tar 是一個不錯的主意!):再來則是移除一些舊的套件:
- /etc/sendmail.cf (或 /etc/mail/sendmail.cf)
- /etc/mail/*
- /usr/sbin/sendmail
- rpm -e mutt
- rpm -e fetchmail
- rpm -e fetchmailconf
- rpm -e --nodeps sendmail
- 安裝 Cyrus-sasl 函式庫:
假設你的 cyrus-sasl-1.5.27.tar.gz 放置在 root 底下,我預設的解壓縮目錄是在 /usr/local/src 底下,那我的步驟就是:
基本上大概這樣就安裝完成 cyrus-sasl 這個套件了!
[root@tsai /root]# cd /usr/local/src
[root@tsai src]# tar -zxvf /root/cyrus-sasl-1.5.27.tar.gz
..........(略)[root@tsai src]# cd cyrus-sasl-1.5.27
[root@tsai cyrus-sasl-1.5.27]# ./configure --prefix=/usr/local \
> --enable-plain --enable-login --enable-pwcheck
上面這一行,在於使你的 cyrus-sasl 安裝在 /usr/local 目錄中;
並且已經啟動了 password_check 的模式。
..........(略)[root@tsai cyrus-sasl-1.5.27]# make clean; make ; make install
..........(略)[root@tsai cyrus-sasl-1.5.27]# cd /usr/lib
[root@tsai lib]# ln -s /usr/local/lib/sasl .
[root@tsai lib]# ln -s /usr/local/lib/libsasl* .
上面這幾行在將你的資料 Link 到 Red Hat 的預設路徑中。[root@tsai sbin]# cd /usr/lib/sasl
[root@tsai sasl]# echo 'pwcheck_method: shadow' > Sendmail.conf
這個目的在於產生一個 Red Hat 的密碼認證資料庫。
- 安裝 sendmail 最新版(到 2001/12 為止):
假設我們的 sendmail.8.12.1.tar.gz 同樣是放置在 /root 底下,而解壓縮檔案要放在 /usr/local/src 底下:
基本上這樣就設定完成了!不過要注意的是,還需要做一下測試!因為在我的系統中,雖然可以具有身份認證的功能,但是一開始卻是捉不到 /etc/sasldb 這個檔案!真是很奇怪!後來,我在 /usr/local/sbin 底下,執行了 ./saslpasswd 及 ./sasldblistusers 這樣就可以了!或者是我的系統太舊了吧!
[root@tsai /root]# cd /usr/local/src
[root@tsai src]# tar -zxvf /root/sendmail.8.12.1.tar.gz
.........(略)[root@tsai src]# cd sendmail-8.12.1
[root@tsai sendmail-8.12.1]# cd /usr/local/src/sendmail-8.12.1/devtools/Site
[root@tsai Site]# vi site.config.m4 <==這個檔案內容如下:PREPENDDEF(`confMAPDEF', `-DMAP_REGEX')
PREPENDDEF(`confOPTIMIZE', `-O2')
APPENDDEF(`confENVDEF', `-DTCPWRAPPERS -DSASL')
APPENDDEF(`conf_sendmail_LIBS', `-lwrap -lsasl')
APPENDDEF(`confLIBDIRS', `-L/usr/local/lib')
APPENDDEF(`confINCDIRS', `-I/usr/local/include')[root@tsai bin]# cd /usr/local/src/sendmail-8.12.1/sendmail
[root@tsai sendmail]# sh Build -c -f /usr/local/src/sendamil-8.12.1/devtools/Site/site.config.m4
.........(開始編譯,略)底下為 sendmail 8.12 的新功能,需要增加一個 smmsp 及 smmsp
使用者,這樣才可以確保安全性!
[root@tsai sendmail]# groupadd -g 25 smmsp
[root@tsai sendmail]# useradd -g smmsp -u 25 -d /var/spool/clientmqueue -s /dev/null smmsp
[root@tsai mail]# chown -R smmsp:smmsp /var/spool/clientmqueue
[root@tsai mail]# chmod -R 770 /var/spool/clientmqueue
新增一個使用者,他無法登入,ID 是 25 號!
這個使用者的家目錄是 /var/spool/clientmqueue
主要僅用於郵件的收受與傳遞!增加這個使用者是
sendmail 8.12 板後新增的功能!主要的目的在於
提供更安全的 sendmail 使用環境![root@tsai sendmail]# cd /usr/local/src/sendmail-8.12.1/cf/cf
[root@tsai cf]# cp generic-linux.mc sendmail.mc
[root@tsai cf]# cat ../feature/access_db.m4 >> sendmail.mc
[root@tsai cf]# cat ../feature/delay_checks.m4 >> sendmail.mc
[root@tsai cf]# cat ../feature/virtusertable.m4 >> sendmail.mc
[root@tsai cf]# vi sendmail.mc <==在最後面加上兩行
TRUST_AUTH_MECH(`LOGIN PLAIN')dnl
define(`confAUTH_MECHANISMS', `LOGIN PLAIN')dnl[root@tsai cf]# sh Build sendmail.cf
[root@tsai cf]# sh Build install-cf
[root@tsai cf]# cd /usr/local/src/sendmail-8.12.1/sendmail
[root@tsai sendmail]# sh Build install
[root@tsai sendmail]# cd ../makemap
[root@tsai makemap]# sh Build install
[root@tsai makemap]# cd ../mailstats
[root@tsai mailstats]# sh Build install
[root@tsai mailstats]# cd /usr/local/src/sendmail-8.12.1
[root@tsai sendmail-8.12.1]# sh Build install[root@tsai mail]# vi access <==這個檔案內容如下:
# makemap hash /etc/mail/access_db < /etc/mail/access
localhost.localdomain RELAY
localhost RELAY
127.0.0.1 RELAY[root@tsai mail]# vi local-host-names
tsai.adsldns.org[root@tsai mail]# vi aliases <==aliases的內容!
mailer-daemon: postmaster
postmaster: root
bin: root
daemon: root
adm: root
lp: root
sync: root
shutdown: root
halt: root
news: root
uucp: root
news: root
uucp: root
operator: root
games: root
gopher: root
ftp: root
nobody: root
apache: root
named: root
xfs: root
gdm: root
mailnull: root
postgres: root
squid: root
rpcuser: root
rpc: root
ingres: root
system: root
toor: root
manager: root
dumper: root
abuse: root
newsadm: news
newsadmin: news
usenet: news
ftpadm: ftp
ftpadmin: ftp
ftp-adm: ftp
ftp-admin: ftp
decode: root
root: vbird
上面的設定是隨系統而變的喔!
不過,最後一行是將 root 的信都寄一份給 vbird 的意思![root@tsai mail]# touch virtusertable
[root@tsai mail]# makemap hash access.db < access
[root@tsai mail]# makemap hash virtusertable.db < virtusertable
[root@tsai mail]# newaliases[root@tsai mail]# /usr/sbin/sendmail -bd -q30m
啟動 sendmail 囉!開始進行測試一下!
[root@tsai mail]# telnet 127.0.0.1 25
Trying 127.0.0.1...
Connected to 127.0.0.1.
Escape character is '^]'.
220 tsai.adsldns.org ESMTP Sendmail 8.12.1/8.12.1; Thu, 13 Dec 2001 14:02:30 +0800
ehlo localhost <==這裡輸入測試點!
250-tsai.adsldns.org Hello localhost [127.0.0.1] (may be forged), pleased to meet you
250-ENHANCEDSTATUSCODES
250-PIPELINING
250-EXPN
250-VERB
250-8BITMIME
250-SIZE
250-DSN
250-ETRN
250-AUTH LOGIN PLAIN <==有這一行就是成功啦!
250-DELIVERBY
250 HELP
- 設定開機時載入:
剩下一個重要的步驟了!就是在開機的時候載入 Sendmail 啦!直接修改 /etc/rc.d/rc.local 在最後一行加入:/usr/sbin/sendmail -bd -q30m
就可以啦!OK!
- 設定用戶端:
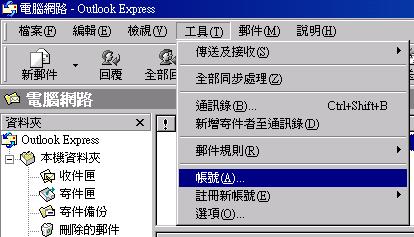
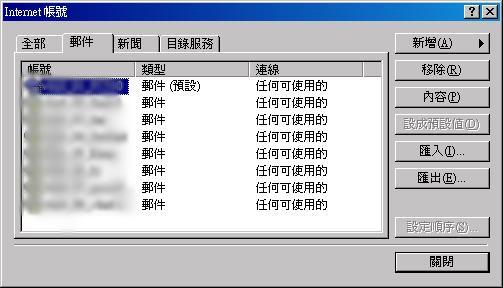
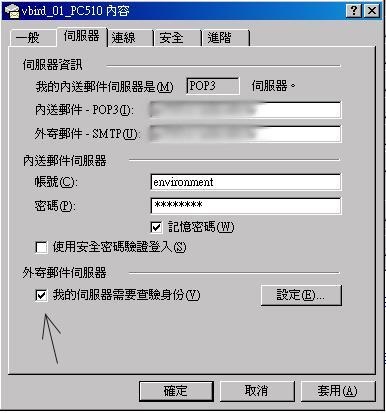
就跟上面的設定相同,去試試看吧: