| [root @tsai
/root]# cd /usr/local/src
[root @tsai src]# cp /root/ucd-snmp-4.2.1.tar.gz . [root @tsai src]# tar -zxvf ucd-snmp-4.2.1.tar.gz [root @tsai src]# cd ucd-snmp-4.2.1 [root @tsai ucd-snmp-4.2.1]# ./configure --prefix=/usr/local/snmp .......(過程我就省略了) ************** Configuration Section **************
You are about to be prompted by a series of questions. Answer
After the configure script finishes, you can browse the newly
-Press return to continue- (這裡按 enter 吧) disabling above
prompt for future runs... yes
*** System Contact Information:
Describes who should be contacted about the host the agent is
System Contact
Information (root@):root@tsai.adsldns.org (這裡輸入你的
e-mail)
*** System Location:
Describes the location of the system. This information is
System Location
(Unknown):RedHat 6.1 (這裡可以隨便輸入,不正確也沒關係)
*** Logfile location:
Enter the default location for the snmpd agent to dump
Location to
write logfile (/var/log/snmpd.log):(按 enter
即可)
*** snmpd persistent storage location:
Enter a directory for the snmp library to store persistent
Location to write persistent information (/var/ucd-snmp):(按 enter 即可) [root @tsai
ucd-snmp-4.2.1]# make
|
| [root
@tsai /root]# cd /usr/local/src
[root @tsai src]# cp /root/mrtg-2.9.17.tar.gz . [root @tsai src]# tar -zxvf mrtg-2.9.17.tar.gz [root @tsai src]# cd mrtg-2.9.17 [root @tsai mrtg-2.9.17]# ./configure --prefix=/usr/local/mrtg-2 \ > --with-gd=/usr/include \ > --with-gd-lib=/usr/lib \ > --with-gd-inc=/usr/include \ > --with-png=/usr/include \ > --with-zlib=/usr/include [root @tsai
mrtg-2.9.17]# make; make install
|
| [root @tsai
mrtg-2.9.17]# cd /usr/local/mrtg-2/bin
[root @tsai bin]# ./cfgmaker --output=/usr/local/apache/htdocs/mrtg/net/mrtg.cfg \ > public@vbird.adsldns.org 上面這個步驟會在你的主機上面製造一個參數檔, 而你未來的設定都會自動的在這個參數檔中設定完成了! [root @tsai
bin]# vi /usr/local/apache/htdocs/mrtg/net/mrtg.cfg
[root @tsai
bin]# ./mrtg /usr/local/apache/htdocs/mrtg/net/mrtg.cfg
[root @tsai
bin]# ./indexmaker \
|
| [root @tsai
bin]# vi /etc/crontab
#1. Runing The
MRTG Net Flow Control
|
- Target[裝置名稱]:
- Target[vbird.adsldns.org_2]: 2: public@192.168.1.2
上面是一般的用法,其中半括號內的是裝置的名稱,同一個裝置的各參數中,這個名稱要一致!
- Target[vbird.adsldns.org_3]:`/usr/local/apache/htdocs/mrtg/cpu/mrtg.cpu`
後面接的是一個自訂的加掛的可執行檔案,這個檔案執行之後,會顯示四個數據,這樣就可以繪圖了!在繪製非 MRTG 程式的預設咚咚中,這個是最常使用的方法了!
- MaxBytes[裝置名稱]:
- MaxBytes[vbird.adsldns.org_2]: 1250000
後面的數字代表資料監測時,最大的傳送速率,使用 bytes,所以 10Mbps 則為 1.25MBytes,大約是 1250000 Bytes。這個數值程式會自動判斷啦!不過你也可以自己修改,用到這個數字的時候是在你的圖表下方,每一個說明後面的(xx%)時用到的。
- MaxBytes[vbird.adsldns.org_3]: 100
如果你的資料並不是 Bytes 時,例如監測 CPU 負載率時,那這個數值就需要改變啦!
- Options[裝置名稱]:
- Options[vbird.adsldns.org_2]: growright, bits (用在網路流量中)
- Options[vbird.adsldns.org_3]: growright, nopercent, gauge (用在 CPU 負載中)
growright:將資料隨時間變化的順序以右而左繪圖;
bits:資料單位為 bits;
nopercent:在圖下方的說明文字中,不顯示百分比;
gauge:圖表的上限固定!
| [root @tsai
cpu]# vi mrtg.cpu
---- 檔案開始
----
# 2. 列出四個數據(前兩個為數字)
[root @tsai
cpu]# chmod 755 mrtg.cpu (設定成可執行)
|
| [root @tsai
cpu]# vi mrtg.cfg.cpu
---- 檔案開始
----
Target[localhost]:
`/usr/local/apache/htdocs/mrtg/cpu/mrtg.cpu`
|
這樣就OK了,直接將 Web 指向 http://your.host.domain/mrtg/cpu/localhost.html
重點說完了!再來說說 sar 吧!基本上, sar 可以用來偵測很多的咚咚,例如:
- sar -u 1 5 :每一秒鐘測一次 cpu ,共計五次後算平均;
- sar -r 3 3:每三秒看一次實體與虛擬記憶體用量,三次後算平均!
- 其他的功能有待你的發掘囉!
| [root @tsai
root]# netstat -a | more
Active Internet connections (including servers) Proto Recv-Q Send-Q Local Address Foreign Address State tcp 0 0 *:ftp *:* LISTEN tcp 0 0 *:telnet *:* LISTEN tcp 0 0 *:pop-2 *:* LISTEN tcp 0 0 *:pop-3 *:* LISTEN tcp 0 0 *:imap2 *:* LISTEN tcp 0 0 *:smtp *:* LISTEN tcp 0 0 *:www *:* LISTEN tcp 0 0 tsai.adsldns.org:www 211.72.119.19:58298 SYN_RECV tcp 0 0 *:mysql *:* LISTEN tcp 0 0 *:netbios-ssn *:* LISTEN tcp 0 57920 tsai.adsldns.org:www 211.75.193.100:2965 ESTABLISHED tcp 0 57920 tsai.adsldns.org:www 211.75.193.100:2966 ESTABLISHED tcp 0 57920 tsai.adsldns.org:www 211.75.193.100:2967 ESTABLISHED tcp 0 57920 tsai.adsldns.org:www 211.75.193.100:2968 ESTABLISHED tcp 0 57920 tsai.adsldns.org:www 211.75.193.100:2969 ESTABLISHED tcp 0 1 tsai.adsldns.org:www 202.98.131.11:4374 FIN_WAIT1 tcp 0 1 tsai.adsldns.org:www 202.98.131.11:4404 FIN_WAIT1 tcp 0 1 tsai.adsldns.org:www 202.98.131.11:4413 FIN_WAIT1 tcp 0 1 tsai.adsldns.org:www 202.98.131.11:4453 FIN_WAIT1 以下省略! |
我們可以很清楚的發現:使用 netstat 可以查到 WWW 的連線數目,那只要將這些數目作一些重複性分析,以去除重複的 IP 網址後,不就可以知道以 WWW 方法上網連線的即時人數了嘛!這就是我們偵測的主要原理了!
| [root @tsai
root]# vi mrtg.person.sh
檔案開始: #!/bin/bash # 這個程式主要在計算有多少人以 WWW 的方式連線進我們的主機! # 1. 計算連線的數目
# 2. 計算連線人數:
# 3. 輸出時間咚咚
|
在上面的式子中,你可以執行出你所需要的咚咚囉!你也可以將 mrtg.person.sh 這個檔案捉下去直接修改!所需要變更的就只有 最後一行的 your.host.name 要改囉!改成您的主機名稱吧!並且將這個檔案改成可以執行的狀態:
| [root @tsai
root]# vi mrtg.cfg.person
檔案開始: # Created by # VBird 2001/10/29 ### Global Config
Options
### CPU Loading
detecting ...
|
要注意的僅是 `/usr/local/mrtg-2/bin/mrtg.person.sh` 這一行字!這個就是我們剛剛才寫成的 scripts 啦!然後同樣的,執行
| [root@vbird mrtg]# /usr/local/mrtg-2/bin/cfgmaker public@192.168.1.11 > mrtg.cfg.vbird |
注意囉! public 是預設的指令,後面接的是你的 IP
(當然也可以是 domain 說)。這樣一來,就可以做出一個參數檔案,名稱為 mrtg.cfg.vbird,我們來看一看這個檔案的大概內容吧!
| [root@vbird
mrtg]# vi mrtg.cfg.vbird
# Created by # /usr/local/mrtg-2/bin/cfgmaker public@192.168.1.11 ### Global Config Options WorkDir: /usr/local/apache/htdocs/mrtg/ Options[_]: growright, bits Target[192.168.1.11_16777219]:
16777219:public@192.168.1.11:
|
MRTG 流量偵測到此為止介紹的都是屬於 NT 或者是 Linux 上面的訊息,那要如何偵測 Windows 98 的系統呢?畢竟使用這個系統的用戶並不少呀!OK!偵測 Windows 系統,最主要的就是要有 snmp 啦!只要有 snmp 之後,往後的工作就都完全一模一樣了!哪我們就在 Windows98 上面安裝 snmp 的服務吧!其實, snmp 套件已經在 windows 98 的原版光碟中了,你可以到原版 98 光碟的 /tools/reskit/netadmin/snmp 這個路徑下找到以下僅提供 snmp 在 windows98 下的安裝方法,至於偵測的方法則與 Windows 2000 的情況一模一樣!目前我已經在 Linux 上以 MRTG 成功的將研究室所有的電腦之網路卡流量偵測了!往後將可便利於管理整個研究室的網路流量,並可以藉以分析是否有不明人士亂玩網路.....
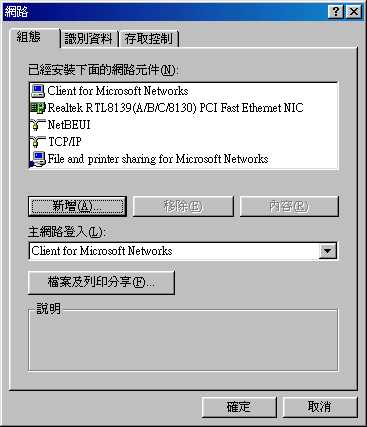
- 你可以在 windows 98 下按下『開始』>『控制台』>『網路』,或者是在桌面的『網路上的芳鄰』按『右鍵』選『內容』,會出現如下方框:
- 請按下『新增』之後,出現:
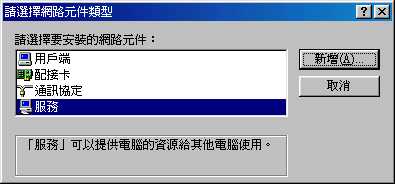
- 選擇『服務』的項目後,並按下『新增』:
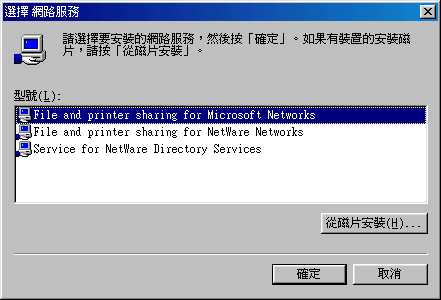
- 然後再選擇『從磁片安裝』這一項!並將你的 snmp 套件指向你的原版 windows 98 光碟!
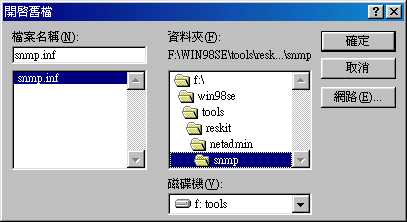
- 按下確定之後,再按一次確定!即可安裝 snmp 套件囉!
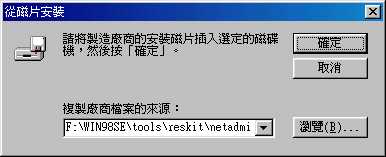
- 就像這樣,出現了這個東西!按下確定吧!開始安裝囉!
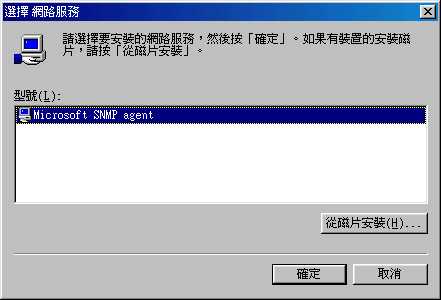
- 有沒有看到如下圖所示! Microsoft SNMP agent 已經出現了!表示安裝完畢!
在寫出這一篇文章之後,收到網友們的熱情支持!讓小弟不甚惶恐!不過,這裡面也出現了一些問題是當初所沒有發現的!以下就來說說問題的所在吧!
- 我的 Red Hat 本身就有 snmp 了,可不可以不要安裝 ucd-snmp 這個套件呢?
當然了,Red Hat 本身就有 snmp 這個通訊服務存在了,可能的話當然就不要去動他比較好囉!不過,要讓你的 Red Hat 預設的 snmp 能動,那就一定需要修改 /etc/snmp/snmpd.conf 這個檔案!不過,小弟對於 snmpd.conf 的設定還不是很瞭解!因此,就會直接建議您,乾脆移除預設的 ucd-snmp 之後,重新安裝新版的吧!設定上比較簡單啦!當然,如果您英文不錯的話, /etc/snmp/snmpd.conf 這個檔案可要多看一些喔!
- 為何作完了 ./cfgmaker 這個動作之後,再執行 ./mrtg 時,會出現:『ERROR: Line 9 』的問題?
這個是大家最容易犯的錯了,其實,就是在 public@your.hosts.name 這一個地方寫錯了!請千萬注意, public 是有意義的代碼,請不要將這一行寫成你的 e-mail 了!不然就會造成錯誤情況發生!