本文已不再維護,更新文章請參考此處
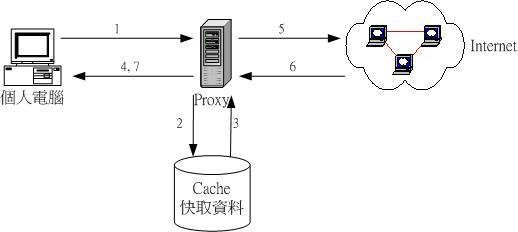
| 代理伺服器的功能可多的呢!在中大型的企業當中,可以藉由單點對外的 Proxy 主機來達到『節省頻寬』的目的,同時,也可以透過這樣的 Proxy 架構來達成『高階防火牆』的設定,這裡的『高階』指的是 OSI 七層協定裡面比較高階段的層級,那就是應用與表現層方面的防火牆啦!那如果對於小型的企業呢?這個 Proxy 也可以達到分流的作用,讓不同的目標網站可以透過不同的上層 Proxy 來取得資料!啊!真是很不錯的一個伺服器啊!不過,這個 Proxy 伺服器也是幾個常見的伺服器裡面,硬體要求相對比較高的一個咚咚!因為 Proxy 要求的是『快速』,所以呢,呵呵!當然硬體等級的要求是相當的『蠻像一回事』的!^_^ |



| [root@test root]# rpm -ivh squidxxxxxxx |
| [root@test
root]# wget \
http://ftp.nsysu.edu.tw/Unix/Proxy/squid/source/STABLE/squid-2.5.STABLE2.tar.gz |
| 0. 解壓縮:
[root@test root]# cd /usr/local/src [root@test src]# tar -zxvf /root/squid-2.5.STABLE2.tar.gz # ....(略)....會產生一個 squid-2.5.STABLE2 的目錄 [root@test src]# cd squid-2.5.STABLE2 1. 開始設定參數: [root@test squid-2.5.STABLE2]# export CFLAGES='-O2 -mcpu=i586' # 這是一個額外的參數啦!因為我們使用的是 Linux ,而我們的 GNU gcc # 有針對每種不同的 CPU 來進行套件的最佳化編譯!所以啦,就加入我們的 # CPU 型號吧!因為我的 CPU 是 P-166 ,反正是個小案例啦!所以才會是 i586, # 您的 CPU 只要超過賽揚等級以上,就會是 i686 囉!此外,除了 # i386, i486, i586, i686 還有 pentium, pentium3, pentium4, athlon, # athlon-tbird, athlon-4, athlon-x, athlon-mp, k6, k6-2, k6-3 等等! # 如果不確定您的 CPU 那麼就用 ix86 之類的方式來命名吧!不過,即使沒有 # 寫入這個參數也無所謂啦!至於那個 O2 是最佳化參數啦! [root@test squid-2.5.STABLE2]# ./configure --prefix=/usr/local/squid \ > --enable-gnuregex --enable-async-io=80 --enable-icmp \ > --enable-kill-parent-hack --enable-snmp \ > --disable-ident-lookups --enable-cahce-digests \ > --enable-err-language="Traditional_Chinese" \ > --enable-poll --enable-linux-netfilter # 這個咚咚就有趣啦!因為實在有相當多的參數可以使用,你可以使用 # ./configure --help 來察看可以使用的許多參數啊!稍微解釋一下各個設定值: --prefix=/usr/local/squid:未來程式編譯完成後放置的安裝目錄; --enable-gnuregex:使用 GNU 提供的正規表示法的原則來進行編譯,請注意, 因為在 Proxy 未來的規劃當中,很可能會動用到正規表示法的方式來 抵擋一些惡意的網站,所以這裡應該要加入這個參數的! --enable-async-io=80:這個項目主要在控制一些輸出入的元件,使用這個項目 可以讓您的 Proxy 效能提升很多喔,因為是非同步輸出 (async) 的模式啊! 後面接的數值是可以變動的,如果您的網站配備很高檔,可以嘗試將這個數字 提升到 160 以上,如果是小網站的話,那麼可以考慮將他降低至 40 左右。 --enable-icmp:要不要支援 ICMP 啊!當然是要的! --enbale-kill-parent-hack:在我關掉 squid 的時候,要不要連同 parent process 一起關掉,當然也是要的啦! --enable-snmp:這個與製圖的 MRTG 比較有關啦!如果沒有用到的話, 可以考慮將這個項目拿掉也沒有關係! --enable-cache-digests:這個項目很重要的啦,我們在底下再進行說明。 --enable-err-language="Traditional_Chinese":不需要寫了吧? 只要有任何的錯誤訊息,網頁上面顯示的語系會是中文喔! --enable-poll :可以提升效能; --enable-linux-netfilter:可以增加通透式 Proxy 的設定!後面再提啦! 2. 開始編譯以及 Install 囉! [root@test root]# make && make install 3. 開始設定其他的相關參數 [root@test root]# vi /etc/man.config # 在這個檔案當中新加入一行: MANPATH /usr/local/squid/man # 與 Squid 有關的 man page # 可以讓 squid 提供的說明文件讓 man 指令可以查到! |
| [root@test
root]# cd /usr/local/squid/etc
[root@test root]# vi squid.conf # 1. 關於網路的參數設定部分 # 在這個部分當中,最重要的就是啟用 squid 這個 daemon 的 port 了! # 在預設的情況下,公認的標準 proxy port 為 3128 ,至於被查詢封包 # 觀察的則是 3130 這個 port,這裡我們分別啟用這兩個 port !如果您的 # Proxy 還有幫人家代理 https 這個由 SSL 協定啟用的 port ,那麼還需要 # 啟動 https_port ,但是我們這裡不談論 SSL 啦!太危險了∼ http_port 3128 icp_port 3130 # 2. 設定快取目錄 ( Cache dir ) 的大小與記錄檔案所在的目錄 # 這個設定是重要到爆的地方,一定得設定正確才行啊!上面我們不是 # 提過關於硬碟與目錄嗎?好了,現在這樣假設:我有兩塊 partition , # 這兩塊 partition 分別掛載在 /usr/local/squid/var/cache1 # 以及 /usr/local/squid/var/cache2 這兩個區域,此外,兩塊 # partition 一塊為 1GB (cache1) 另一塊為 2 GB (cache2) ,則設定為: # <cache_dir> <aufs|ufs> <目錄所在> <MBytes大小> <dir1> <dir2> # 那個 aufs 只有在編譯的時候加入 --enable-async-io 那個項目才有支援, # 至於目錄所在地與所佔用的磁碟大小則請視您的主機情況而定, # 而後面 dir1, dir2 則是兩個次目錄的大小,通常 16 256 或 64 64 皆可, # 一般來說,數字最好是 16 的倍數,據說效能會比較好啦! # 注意1: 下面兩行需要『視您的主機環境而定!』不要照抄! # 注意2: 在底下的例子中,我的兩塊 partition 已經 mount 上該目錄了! # 這也就是說,底下的兩個目錄是『已經存在的!』 cache_dir aufs /usr/local/squid/var/cache1 1000 16 256 cache_dir aufs /usr/local/squid/var/cache2 2000 16 256 # 底下則是關於記錄檔的放置目錄與檔名! cache_access_log /usr/local/squid/var/logs/access.log cache_log /usr/local/squid/var/logs/cache.log cache_store_log /usr/local/squid/var/logs/store.log pid_filename /usr/local/squid/var/logs/squid.pid # 3. 關閉認證機制 # 不曉得為什麼,這一版的 squid 會自動的加入認證機制,請找到底下 # 幾行,將他 mark 起來! #auth_param basic children 5 #auth_param basic realm Squid proxy-caching web server #auth_param basic credentialsttl 2 hours # 4. 提供 squid 服務 # 預設的情況下,僅有本機可以使用 squid ,我們先將所有的權限開放 # 然後在一個一個的關閉囉!先找到底下這一行: http_access deny all # 將他改成 http_access allow all # 5. 設定 squid 的擁有者與系統管理員信箱: # 就是剛剛我們上一小節提到的 squid 的擁有者,請注意,這個 # user 與 group 必需要在 /etc/passwd 及 /etc/group 裡面存在方可成功! # 我這裡以權限最小的 nobody, nogroup 來做為範例,您也可以自行設定! # 另外,cache_mgr 則是 squid 管理員的信箱,當 squid 發生問題時, # 螢幕上就會出現這個信箱給使用者聯繫管理員之用! cache_effective_user nobody cache_effective_group nogroup # 您也可以改成 nobody ! cache_mgr youraccount@your.e.mail # 6. 變更目錄權限: # 在預設的情況下,我們主要的紀錄資訊都寫入 /usr/local/squid/var 裡面, # 所以這個時候需要將這個目錄的權限改變成為 nobody 與 nogroup 所有! # 當然囉,如果您的 cache_dir 不在這個目錄當中,那麼還需要額外自行建立, # 例如我的 cache_dir 萬一是在 /proxy1 與 /proxy2 時,那麼我就必需要: # chown -R nobody:nogroup /proxy1 # chown -R nobody:nogroup /proxy2 # 關於權限的問題是很重要的!請不要忘記了! [root@test root]# chown -R nobody:nogroup /usr/local/squid/var # 7. 開始啟動 squid: # 啟動 squid 來試看看吧!不過,首先我們必需要建立快取目錄的格式 # 才行,此外,由於我們想要以 nobody 來啟動 squid ,所以你需要這樣: [root@test root]# /usr/local/squid/sbin/squid -z # 建立 cache_dir [root@test root]# su nobody -c "/usr/local/squid/bin/RunCache &" # 8. 查看是否真的啟動了 squid 了? [root@test root]# netstat -tln | grep 3128 tcp 0 0 0.0.0.0:3128 0.0.0.0:* LISTEN # 9. 重新讀取設定檔 squid.conf 的方法: [root@test root]# /usr/local/squid/sbin/squid -k reconfigure |
| # 與記憶體有關的設定:因為我的系統很小,所以只給
8 MB!如果您的實體記憶體
# 很大的情況下,例如 512 MB,可以考慮加大到 64 或 128 MB。 cache_mem 8 MB # 與磁碟容量有關的設定(註:下列的 90 與 95 是百分比 ) # 如果您的 cache_dir 所在磁碟很大時,可以考慮將 4096 改成 32768 KB cache_swap_low 90 cache_swap_high 95 maximum_object_size 4096 KB # 與記憶體保存資料有關的設定 maximum_object_size_in_memory 8 KB # 我們經由 dns 正反解以及 IP 的結果,記錄在暫存區啊! ipcache_size 1024 ipcache_low 90 ipcache_high 95 fqdncache_size 1024 |
| <acl> <acl名稱> <acl類型> <設定的內容> |
| <cache_peer>
<主機名稱> <類別> <http_port> <icp_port> <其他參數>
類別:主要有上層(parent) 與同一層 (sibling) 兩種,我們這裡主要介紹的是 上層 Proxy 也就是 parent 這一大類,如果您想要架設一個小型的 Proxy Cluster 的話,可以考慮組成 sibling 的功能,由於我們僅想要架設單部 Proxy Server ,所以這裡我們就不探討 sibling 了! http_port icp_port:就是我們最前面設定的啦! Internet 上面預設是 3128 3130 這兩個! 其他參數:其他參數的部分就很重要了,主要有底下幾個重要參數: proxy-only :只取出上層 Proxy 的 cache 給 client ,並不會將上層 Proxy 的資料存在自己的 cache 硬碟中; weight=n :權重的意思,因為我們可以指定多部上層 Proxy 主機,哪一部 最重要?就可以利用這個 weight 來設定, n 越大表示這部 Proxy 越重要! no-query :一般來說,如果要向 sibling 要求資料時,會向 sibling 送出 icp 的要求封包,使用 no-query 就可以取消。一般來說,如果向上層 Proxy 要求資料時,可以不需要發送 icp 封包,以降低主機的負擔 default :表示該部主機為預設的 Proxy 主機的意思; no-netdb-exchange:表示不向附近的 Proxy 主機送出 imcp 的封包要求 no-digest :表示不向附近主機要求建立 digest 紀錄表格。 範例: cache_peer gate.ncku.edu.tw parent 3128 3130 no-digest no-netdb-exchange cache_peer gate2.ncku.edu.tw parent 3128 3130 no-digest no-netdb-exchange cache_peer gate3.ncku.edu.tw parent 3128 3130 no-digest no-netdb-exchange cache_peer proxy.ncku.edu.tw parent 3128 3130 no-digest no-netdb-exchange |
| 0. 自己想要直接使用自己的
Proxy 捉取的資料
acl directip dst 140.116.44.0/24 acl directdn dstdomain .vbird.org tw.yaoo.com tw.news.yahoo.com 1. 成大附近的網域
|
| # 主要的格式範例:
# <cache_peer_access> <上層 Proxy > <allow|deny> <acl名稱> cache_peer_access gate.ncku.edu.tw allow comdn cache_peer_access gate.ncku.edu.tw deny !comdn cache_peer_access gate3.ncku.edu.tw allow netdn cache_peer_access gate3.ncku.edu.tw allow edudn cache_peer_access gate3.ncku.edu.tw deny !netdn cache_peer_access gate3.ncku.edu.tw deny !edudn cache_peer_access gate2.ncku.edu.tw deny comdn cache_peer_access gate2.ncku.edu.tw deny netdn cache_peer_access gate2.ncku.edu.tw deny edudn cache_peer_access gate2.ncku.edu.tw deny directdn cache_peer_access gate2.ncku.edu.tw deny directip cache_peer_access gate2.ncku.edu.tw deny twdn cache_peer_access gate2.ncku.edu.tw deny twip cache_peer_access gate2.ncku.edu.tw deny nckudn cache_peer_access gate2.ncku.edu.tw deny nckuip cache_peer_access proxy.ncku.edu.tw deny comdn cache_peer_access proxy.ncku.edu.tw deny netdn cache_peer_access proxy.ncku.edu.tw deny edudn cache_peer_access proxy.ncku.edu.tw deny directdn cache_peer_access proxy.ncku.edu.tw deny directip cache_peer_access proxy.ncku.edu.tw deny twdn cache_peer_access proxy.ncku.edu.tw deny twip cache_peer_access proxy.ncku.edu.tw deny nckudn cache_peer_access proxy.ncku.edu.tw deny nckuip |
| hierarchy_stoplist
cgi-bin ?
acl QUERY urlpath_regex cgi-bin \? no_cache deny QUERY |
| # 1. 關於 cache
的更新時間趨勢
# 我們在快取當中的資料總是需要更新的對吧!那麼如何設定更新的時間呢? # <refresh_pattern> <regex> <最小時間> <百分比> <最大時間> # 注意,那個 regex 指的是『目標』,這個『目標』大部分為網址,而這個網址 # 使用正規表示法來表示就是了!上面的意義是說:最小的時間內 (分鐘),如果 # 檔案有更動,就直接更新,或者是目標檔案上次更新的時間到現在已經經過最大 # 時間的『百分比』時,就予以更新!範例如下: refresh_pattern ^ftp: 1440 20% 10080 refresh_pattern ^gopher: 1440 0% 1440 refresh_pattern . 0 20% 4320 # 第一行的意思是,如果網址裂開頭是 ftp 的話,那麼在一天(1440分鐘)後,如果 # proxy 再次取用這個檔案時,則 cache 內的資料會被更新! # 2. 關於連線時間限制
|
| # 1. 使用 acl
先定義出要直接或者不要直接去的網址或 IP ,
# 這個部分我們剛剛在上面已經設定好了,就是 directip 與 directdn, # 還有 twdn 與 twip 這幾個咚咚! # 2. 如果是直接要 Proxy 出去捉資料,可以使用 always_direct always_direct allow directip directdn # 3. 如果一定『拒絕經由上層
Proxy 出去』的話,可以使用 never_direct
# never_direct
allow 表示一定會經由上層 Proxy 來捉資料,
|
| # 1. 先設定這個內部網域的
acl 名稱
acl inside src 192.168.0.0/24 # 2. 設定 http_access 讓他可以使用 http_access allow inside http_access deny all |
| [root@test
root]# cd /usr/local/squid/etc
[root@test etc]# vi squid.allow.sh #!/bin/bash # 這支程式可以用來查尋您的 IP 喔! # 1. 請輸入您的主機名稱,請注意,如果有兩個以上的主機名稱,
# 2. 以下為程式段,看看就好了!
cat /dev/null
> $basedir/squid.allow.hosts.now
for host in
$hostnames
if [ "$runornot"
== "yes" ]; then
|
| # 1. 先設定這個檔案的名稱吧!
acl allowhost src "/usr/local/squid/etc/squid.allow.hosts" # 2. 設定 http_access 讓他可以使用 http_access allow allowhost http_access deny all |
| [root @test
root]# vi /etc/crontab
10,30 * * * * root /usr/local/squid/etc/squid.allow.sh |
| # 與 FTP 有關的設定項目,主要是針對被動式連線方式來設定喔!
ftp_user Squid@ ftp_passive on # 主要與 DNS
的設定值有關,如果在高負載的 Proxy 環境下,可以考慮將
|
鳥哥的範例:http://linux.vbird.org/linux_server/0420squid/0420squid_vbird_ex
成大 gate.ncku.edu.tw 的 squid.conf 設定:http://turtle.ee.ncku.edu.tw/~tung/proxy/squid.conf.ncku
電機系 turtle.ee.ncku.edu.tw 的 squid.conf 設定:http://turtle.ee.ncku.edu.tw/~tung/proxy/squid.conf.turtle
台南學校範例 proxy.school.tn.edu.tw 的 squid.conf 設定:http://turtle.ee.ncku.edu.tw/~tung/proxy/squid.conf.school.tn

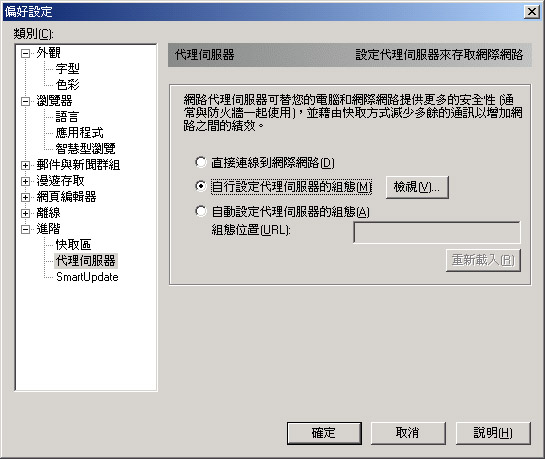
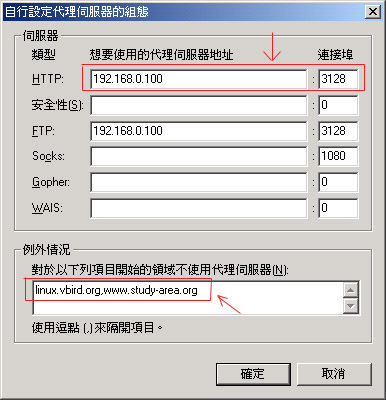

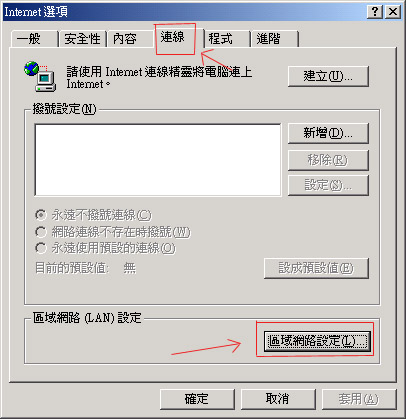
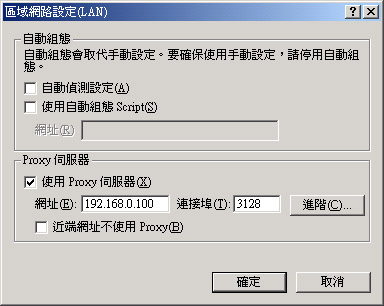
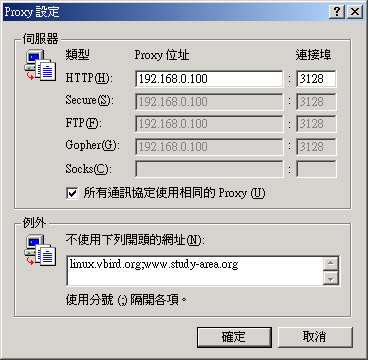
| 1. 確認一下到底有沒有我們需要的一些相關套件?
[root@test root]# rpm -qa | egrep '(^gd-|^zlib-|^libpng-)' libpng-devel-1.0.14-0.7x.4 gd-1.8.4-4 zlib-1.1.3-25.7 zlib-devel-1.1.3-25.7 libpng-1.0.14-0.7x.4 gd-devel-1.8.4-4 # 請注意,我是以 Red Hat 7.2 為例,如果您的系統並非 RH 7.2 ,那麼可能 # 套件後面接的版本會不太一樣,不過,至少都需要有上面的幾樣套件就是了! # 就是 gd, zlib, libpng 這三個套件啦!有的 distribution 還會有 xxx-devel # 之類的名稱,那個也需要安裝喔!如果發現沒有安裝的話,請拿出您的原版光碟片, # 將他 mount 上之後,好好的將他搜尋一下,並且安裝上去吧!很重要,一定要 # 安裝這些套件之後,底下的動作才會成功呢! 2. 開始安裝 fly 這支程式 [root@test root]# cd /usr/local/src [root@test src]# tar -zxvf /root/fly-2.0.0.tar.gz # ....會產生一個 fly-2.0.0 的目錄 [root@test src]# cd fly-2.0.0 [root@test fly-2.0.0]# make 註: # ....如果沒有出現底下的字樣那麼就是成功了! /usr/bin/ld: cannot find -lttf (或者是 ljpeng ...) collect2: ld returned 1 exit status make: *** [fly] Error 1 # 如果是出現 warning 的話,還不打緊,因為僅只是警告而已,所以問題不大, # 但是如果出現上面的字樣時,就會連帶出現第三行的 Error ,那就是編譯失敗了 # 果真如此的話,請先尋找一下,以上面為例,找不到 lttf ,而 lttf 其實 # 就是 libttf 檔名啦!(所以 ljpeg 就是 libjpeg )所以給他下達: loate libttf /usr/lib/libttf.so.2 # 嗯!找到了!其實是 libttf.so.2 啦!如果你的系統跟我的不同,有可能檔名 # 會不一樣,所以請依照你的螢幕顯示的訊息來下達指令喔!但是這個編譯程式 # 有點笨,不認識這個檔案,所以我們要欺騙他一下,就是下達: ln -s /usr/lib/libttf.so.2 /usr/lib/libttf.so # 這樣就可以啦!如果還有找不到的檔案,同樣的方式給他連結一下即可!然後 # 再次的給他執行一次 make 即可!最後會產生一個檔名為 fly 的執行檔, # 如果沒有產生執行檔,那就是有問題啦!請趕緊再回頭去查一查是否有某些 # 套件沒有安裝,或者沒有依照上面的方式建立連結檔案! [root@test fly-2.0.0]# cp fly /usr/local/bin 我們先將 fly 這支程式給他複製到 /usr/local/bin 這個目錄去,可以直接使用 這樣就 OK 了! 3. 開始安裝 pwebstats 套件 [root@test root]# cd /usr/local/src [root@test src]# tar -zxvf /root/pwebstats-1.3.8.tar.gz # 此時會產生 /usr/local/src/pwebstats-1.3.8 這個目錄,這目錄裡面 # 已經是可以執行的資料了,不需要進行任何的編譯,所以我們將他直接移動到 # /usr/local/ 裡面去! [root@test src]# mv pwebstats-1.3.8 /usr/local/pwebstats [root@test src]# cd /usr/local/pwebstats [root@test pwebstats]# vi pwebstats <==這個是主要的執行檔! # 由於我們的 perl 這個程式語言的執行檔是放置在 /usr/bin/perl ,但是 # 這支程式預設是書寫為: #!/usr/local/bin/perl # 將上面改寫為 #!/usr/bin/perl # 這樣就可以了!繼續下一步! 4. 開始設定 squid 的輸出輸入參數: 前提要件: a. 我的 WWW 主頁目錄在 /var/www/html b. 我的 pwebstats 整個資料庫放置在 /usr/local/pwebstats c. 我的 squid 登錄檔放置在 /usr/local/squid/var/logs/access.log.0 d. 我的 squid 的執行檔為 /usr/local/squid/sbin/squid e. 我的 pwebstats 輸出的資料放置在 /var/www/html/pwebstats f. 我的 fly 是放在 /usr/local/bin/fly [root@test pwebstats]# mkdir /var/www/html/pwebstats<=請依您的主機而定 [root@test pwebstats]# cd /usr/local/pwebstats/conf [root@test conf]# vi squid-proxy.conf <==這個就是主要的設定檔! # 底下請填寫你的主機的『暱稱』! server:My_Proxy_Server # 這個是顯示在網頁上面的標題內容! Server_header:我的代理伺服器 # squid 登錄檔放置的完整檔名 logfile:/usr/local/squid/var/logs/access.log.0 # 我們使用的就是 squid 的登錄檔啊!所以這裡不需改變 logtype:squid # 剛剛提到的,網頁資料要輸出到底下的目錄 outdir:/var/www/html/pwebstats # 一些圖像檔案的預設目錄,這裡我們使用 pwebstats 提供的目錄! templates:/usr/local/pwebstats/templates # 嗯!我們就天天來進行一次吧!可以用 weekly 或 daily interval:daily # 是否在執行的過程中給他輸出訊息呢?好吧! verbose:true # fly 放置的目錄,剛剛我們移動的目錄啊! fly_prog:/usr/local/bin/fly # 本機端的要求,這裡可以不用設定喔! local_patt: # 列出幾部 client 電腦?我給他來個 50 部好了! host_threshold:50 # 列出幾部 Server (被要求資料者),還是給個 100 部吧! remote_host_threshold:100 # 統計的次數,給他 100 次好了! item_threshold:100 # 做多少個 domain 的分析?給他 15 個就夠多了! domain_threshold:15 # 底下保留預設值即可! (最後面的 dns 反查可以啟動!) exclude_reqs:true #complete_exclude_host: #complete_exclude_url_patt: #complete_exclude_user: dns_lookup:true # 事實上,只要上面粗體字的地方寫對就好了!其他的保留預設值即可! 5. 測試執行一次看看: [root@test conf]# /usr/local/squid/sbin/squid -k rotate 上面這個動作會將 squid 的登錄檔進行 logrotate 的動作喔!就會更新了 /usr/local/squid/var/logs/access.log.0 這個檔案啦! [root@test conf]# /usr/local/pwebstats/pwebstats -c \ > /usr/local/pwebstats/conf/squid-proxy.conf .....(略)...... -- Reading in log file /usr/local/squid/var/logs/access.log.0: The logfile has 27 entries. Processing... 0% 50% 100% |-----------------------|------------------------| ################################################## Finished. .....(略)...... 呵呵!這樣就是成功啦!!!! 6. 將每天執行的指令寫成 scripts 吧! # 我將他寫在/usr/local/pwebstats/pwebstats.sh 這個檔案當中喔! [root@test conf]# vi /usr/local/pwebstats/pwebstats.sh #!/bin/bash /usr/local/squid/sbin/squid -k rotate sync; sleep 5s /usr/local/pwebstats/pwebstats -c /usr/local/pwebstats/conf/squid-proxy.conf [root@test conf]# chmod 755 /usr/local/pwebstats/pwebstats.sh [root@test conf]# vi /etc/crontab # 加入底下這一行吧! 59 2 * * * root /usr/local/pwebstats/pwebstats.sh >/dev/null 2>&1 |
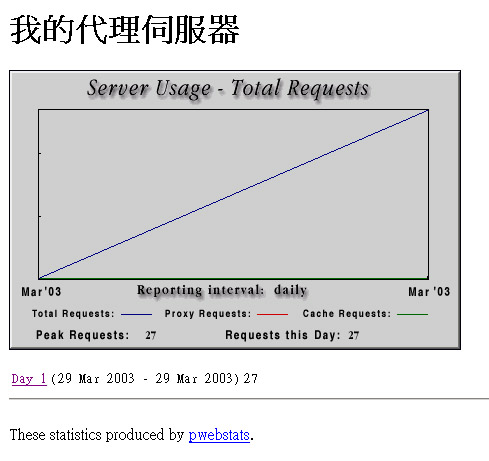
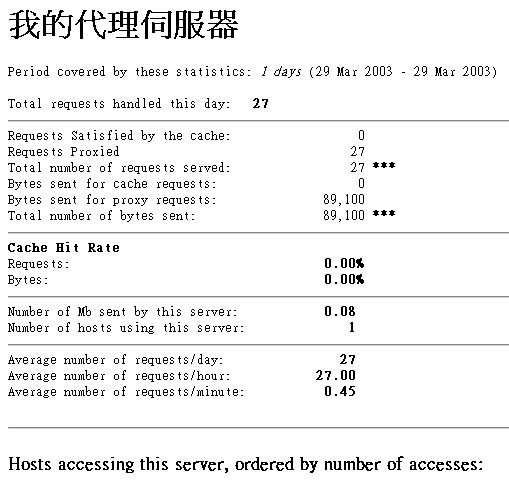
| # 1. 解壓縮:
[root@test root]# cd /usr/local/src [root@test src]# tar -zxvf /root/sarg-1.4.taiwan_big5.tar.gz ....(略)..... 這個時候會產生一個名為 sarg-1.4 的目錄出來! # 2. 設定、編譯與安裝 [root@test src]# cd sarg-1.4 [root@test sarg-1.4]# mkdir /usr/local/sarg [root@test sarg-1.4]# ./configure --prefix=/usr/local/sarg \ > --enable-mandir=/usr/local/sarg/man1 \ > --enable-bindir=/usr/local/sarg/bin \ > && make && make install 這樣可以快速的設定、編譯與安裝,一次完成! 安裝的資料當中: a. 設定檔 /usr/local/sarg/sarg.conf b. 執行檔 /usr/local/sarg/bin/sarg c. 說明檔 /usr/local/sarg/man1/sarg.1 # 3. 額外設定 ( 說明文件的路徑 ) [root@test root]# vi /etc/man.config (有時為 man.conf 檔名不同!) 新增加這一行 MANPATH /usr/local/sarg |
| [root@test
root]# mkdir /var/www/html/sarg
[root@test root]# vi /usr/local/sarg/sarg.conf # 這個檔案是 sarg 的設定檔,裡面已經將整個設定參數講的很清楚了, # 你可以依照你的情況來調整這個檔案的參數,無論如何,這個檔案裡面 # 應該至少要有底下這幾個資料,其他的請自行使用喔! language Taiwan_big5 access_log /usr/local/squid/var/logs/access.log.0 title "Squid 使用狀態報告" temporary_dir /tmp output_dir /var/www/html/sarg overwrite_report no mail_utility /bin/mail topsites_num 100 exclude_codes /usr/local/sarg/exclude_codes max_elapsed 28800000 charset big5 [root@test root]# /usr/local/sarg/bin/sarg SARG: 製作報告完成於 /var/www/html/sarg/2003Apr10-2003Apr11 |
| 1. 建立這支程式:
我將他取名為 /usr/local/squid/etc/squid.logrotate
[root@test root]# vi /usr/local/squid/etc/squid.logrotate #!/bin/bash # 這支程式是要寫來做為 squid 的 log files analysis 之用的! # 執行的方法為 crontab 囉! # vi /etc/crontab 加入底下這一行: # 59 23 * * * root /usr/local/squid/etc/squid.logrotate # 1. parameters settings PATH=/sbin:/bin:/usr/sbin:/usr/bin # 2. stoping and rotating squid sleep 50s /usr/local/squid/sbin/squid -k rotate /usr/local/squid/sbin/squid -k shutdown # 3. pwebstats processing /var/www/html/pwebstats/pwebstats -c \ /var/www/html/pwebstats/conf/squid-proxy.conf \ > /dev/null 2>&1 # 4. sarg processing /usr/local/sarg/bin/sarg > /dev/null 2>&1 # 5. starting squid sleep 11s su nobody -c "/usr/local/squid/bin/RunCache &" > /dev/null 2>&1 # 2. 改變檔案權限與加入 crontab 排程當中! [root@test root]# chmod 744 /usr/local/squid/etc/squid.logrotate [root@test root]# vi /etc/crontab 加入這一行: 59 23 * * * root /usr/local/squid/etc/squid.logrotate |
| [root@test
root]# vi /usr/local/squid/etc/squid.conf
# 這裡請填入你的 Proxy 主機名稱 與 port ! httpd_accel_host vbird.adsldns.org # 因為我們是要進行 WWW 的資料快取,所以 port 當然就是 80 囉! httpd_accel_port 80 # 這個很重要!因為設定 httpd_accel_host 之後, cache 的設定會自動被終止, # 必須要加上這個設定為 on 之後,才能提供 cache 的功能! httpd_accel_with_proxy on httpd_accel_uses_host_header on [root@test root]# /usr/local/squid/sbin/squid -k reconfigure |
| iptables -t
nat -A PREROUTING -i eth0 -p tcp -s 192.168.0.0/24 \
--dport 80 -j REDIRECT --to-ports 3128 |
| 1. 停止 squid
[root@test root]# kill -9 `cat /usr/local/squid/var/logs/squid.pid` (可能會重複做 5 次左右才會完全砍掉!) 2. 刪除暫存目錄
(這個目錄請依您的系統而定!)
3. 重建快取目錄並重新啟動
|