- 鍵盤的格式;
- 滑鼠的格式;
- 螢幕的格式,包含解析度、水平、垂直更新頻率等等;
- 顯示卡的主要驅動程式,也就是所謂的X server最主要的內容啦!
- 顯示的解析度:
目前最流行的兩套Linux:Mandrake與Red Hat均提供不錯的軟體來設定XF86Config-4,那就是:
- Mandrake XFdake
- Red Hat Xconfigurator
- Mandrake : XFdrake
- 偵測系統的硬體設定:
- Graphic Card: 這個顯示目前你的顯示卡晶片;
- Monitor: 顯示目前你的螢幕廠牌或者選擇自訂(Custom)
- Resolution: 選擇你的X-Window顯示的解析度
- Test: 立即測試你的硬體設定
- Options: 讓你選擇是否開機的時候進入X-Window
- Quit: 離開XFdrake這個程式!
- 顯示卡晶片組的選擇:Graphic Card
- 設定螢幕:Monitor
- 設定X-Window解析度:Resolution
- 實地測試:Test
- 設定run-level:Options
- 離開XFdrake:Quit
- Red Hat : Xconfiguration
- 執行 Xconfigurator :
- 設定螢幕與螢幕解析度:
- 顯示卡相關設定:
- 色彩度的設定:
直接在指令列模式中輸入XFdrake開始使用 XFdrake 的 X 設定囉!

進入XFdrake之後的第一個動作即是在偵測你的主機上面的硬體啦!如果捉到硬體之後,會將你的Linux主機上面的硬體給他顯示在畫面上,如同上圖所示,而且有幾個設定值:
請注意,在選擇的時候,必須要使用<tab>按鍵,使游標移動到OK之後,才可以進入各細項去選擇呢!
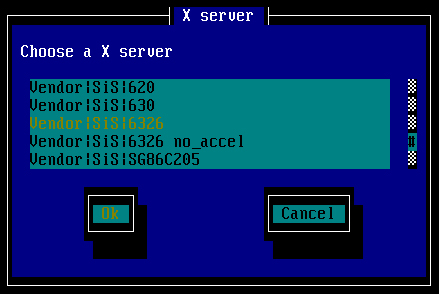
在按下了Graphic Card之後,會出現可以選擇晶片組的畫面來,如下圖所示,在下圖中,基本上會有三個欄位,第一個Vendor是說廠商,第二個SIS則是發展的廠商名稱,例如你的顯示卡是Nvidia的,那麼就選擇Nvidia吧!第三個則是這個廠商的支援晶片組!嗯!選擇你的顯示卡吧!我這裡是使用SIS的6326啦!
好了,確定了晶片組之後,由於我們的X11目前有兩版,所以必須要先確認一下你的X11版本為何?因為這兩個版本使用的晶片組驅動程式並不相同呀!因此,按下OK之後會出現下面圖示:

由於我是使用version 4,所以這裡就選擇XFree 4.2.1囉!選擇了XFree 4.2.1之後,系統會回復到最先前的畫面喔!
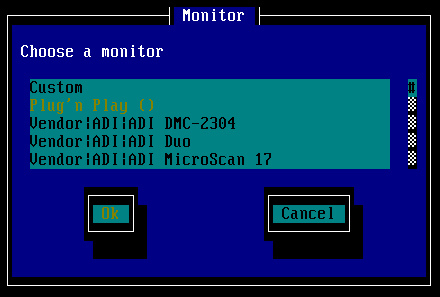
設定完了顯示卡之後,再來則是設定另外一個很重要的咚咚,就是顯示器,也就是螢幕設定啦!在螢幕的設定當中,首先,你可以選擇程式提供的顯示器的廠牌,如下圖所示,如果你可以找到你的螢幕廠牌的話,那麼直接點選就可以啦!如果找不到的話,那麼就直接選擇Custom吧!
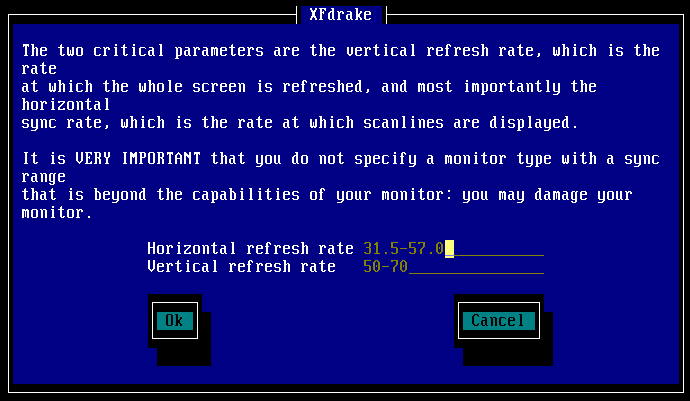
如果剛剛上面選擇了廠牌的話,那麼程式將會自動設定水平、垂直更新頻率;但是,如果是選擇了Custom的話,那麼就會出現如上的圖示來要求你輸入水平、垂直的更新頻率。這裡請特別留意呢,因為這兩個頻率設定錯誤的話(如果設定得太高了的話)很有可能會造成『螢幕的燒毀』,通常設定水平31-57及垂直50-90應該都不會有問題啦!這裡設定完之後,又會回到最先前的畫面。
在按下了Resolution之後,會出現下圖:
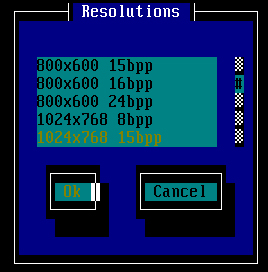
在螢幕的解析度上面,這個就隨個人的喜好而定了,鳥哥特別喜歡字小小的,桌面大大的,所以比較偏好1024x768這樣的設定值囉!
再來,如果按下Test之後,XFdrake就會幫我們進行測試工作了!奇怪的是,我做了好幾次,結果都沒有辦法Test成功!真是奇怪?如果在這個畫面中當掉了,不要慌張,按下[Ctrl]+[Alt]+[F1]就會回到原來的畫面,基本上,不Test也沒有關係啦!
接著下來則是設定是否開機即啟動X-Window,也就是所謂的run-level 5啦
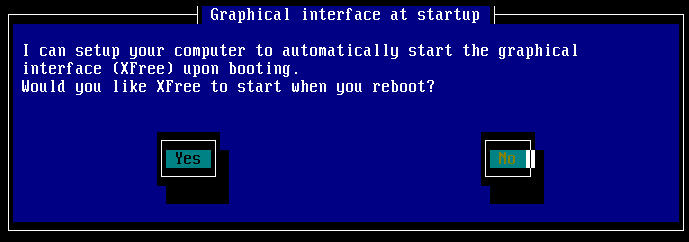
以我為例,因為我的Linux都是拿來當伺服器用的,而且對於X-Window不是很有使用的時機,所以我都是以run-level 3來登入Linux的,自然也就選擇No囉!
這樣就設定完畢了!所以選擇離開,這個時候會出現如下的圖示:
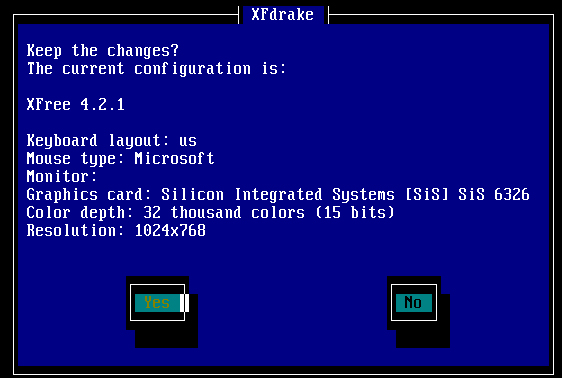
如果確定一切都沒有問題,就給他按下『Yes』吧!這樣就完成設定了!當然啦,你的/etc/X11/XF86Config-4就被更改囉!
在 Red Hat 裡面也有個 Xconfiguration 來簡單的設定我們的 X Window 的各項設定喔!
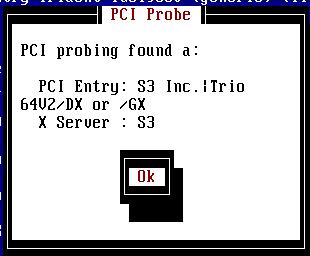
這個時候會出現一個歡迎畫面,按下 OK 之後,系統會自動去捉顯示卡的晶片組。 如果顯示卡是這一版的 XFree86 有支援的話,那系統就會顯示出你的顯示卡型號,如下圖所示為 S3 的 Trio64v2 晶片:
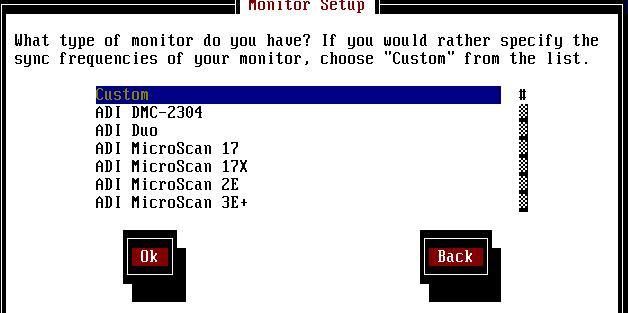
上圖按下 OK 之後會開始去設定顯示器(螢幕),一般我們都用自訂的方法去捉螢幕,所以選擇 Custom 手動設定(第一項),如下圖所示:
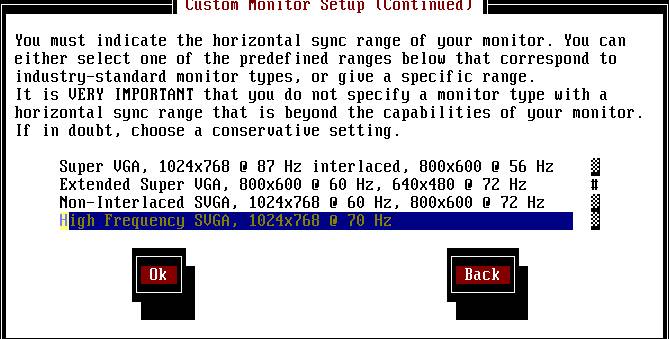
按下 OK 之後,系統會告訴你一些訊息,再按下 OK 後,就會出現如下的畫面,告訴你應該要選擇哪一個螢幕的解析度,通常我們都會選擇『High Frequency SVGA, 1024x768 @ 70Hz 』那一個選項。
上圖按下 OK 之後,就會要求你選擇垂直解析度,通常我們都是選擇第二項,也就是 50-90 那一項即可;
再來系統會問你是否要讓 XFree86 自己捉顯示卡相關的資訊?這裡可以按 Probe 也可以按 Don't Probe ,只是,如果你確切的知道你的顯示卡記憶體的大小的話,這裡建議選擇 Don't Probe; 上一步驟選擇 Don't Probe 之後,系統會要你選擇你的記憶體,請依你的顯示卡記憶體實際大小輸入,如果是 S3 Vrige 的話,通常是 1M 或者是 2M 左右吧!
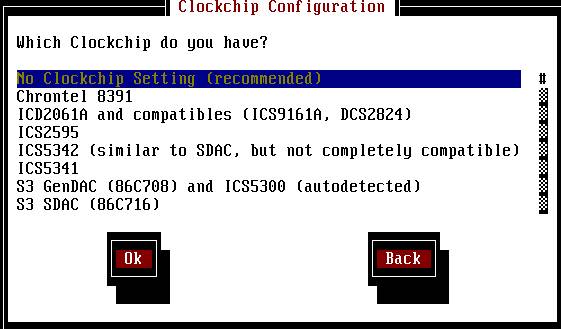
選完了記憶體大小之後,過來是選擇你的記憶時脈晶片,由於我們通常不是很清楚我們的晶片是哪一個,所以這裡只好讓系統自己捉,如下圖,直接選擇 No Clockchip Setting 即可!
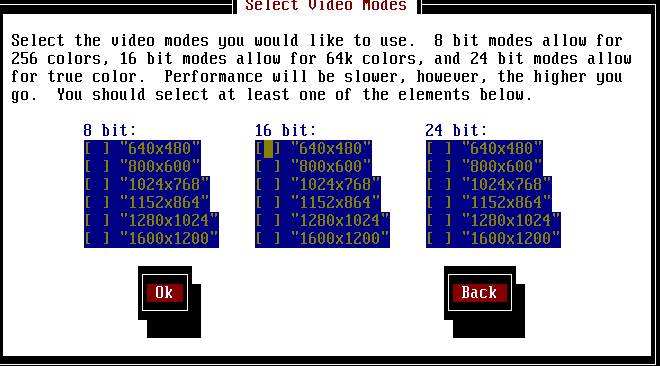
再來則是選擇畫面解析度與色彩量,如下圖所示,一般而言,如果你的 X-Window 一直有問題,這裡可以選擇 8 bit,及 640x480 的最原始設定就好!如果你的 X-Window 沒有問題,可以正常的使用了,而你覺得你想要讓你的色彩最大化,則可以僅選擇 24 bit 及 1024x768 這一項即可!如此一來,你就可以以你最喜歡的解析度與色度進入 X-Window 啦!(注意喔,在 bit 之間以 tab 鍵移動,而以 空白鍵 確定!)
接著下來系統告訴你要開始測試 X-Windows 啦,按下 OK 之後系統就開始測試 X-Window!在這個地方要注意一下,如果你的設定不完全,則系統將會回到第三步驟重新再設定,如果你在這一個步驟重複了三次以上仍無法設定成功,那就必須以 xf86config 這支程式設定了!
如果你可以正常的看到一個游標及一個框框告訴你還有10秒鐘的時間可以按確定,那就表示你的 X-Window 可以用啦!這個時候請選擇 OK,然後出現的另一個框框告訴你:『是否要在下次開機的時候以圖形介面登入』,這一步千萬選擇『NO』,因為以 X-Window 為預設的開機介面,個人覺得並不好,因為不但佔用了較多的系統資源,而且,並不會比較好使用!
完成設定了,跳出 Xconfigurator 後,以 startx 進入 X-Window !